
Views: 0 Author: Site Editor Publish Time: 2026-09-09 Origin: Site


Tourists evaluate a destination's perceived value through its merchandise. Quality matters at every retail touchpoint. A poorly executed reproduction diminishes both sales and brand equity. Souvenirs act as tangible memories for travelers. Visitors want authentic, highly detailed reminders of their experiences.
You face a major manufacturing challenge here. Translating complex architectural geometry or natural topography into a tiny three-inch canvas requires absolute precision. Every physical angle must reflect reality. Poor material choices lead to lost details, clumsy shapes, and unsold inventory.
We created this guide to objectively evaluate your material options. Our goal is to help you produce a flawless custom landmark fridge magnet. We evaluate these options based on detail retention, unit economics, and physical durability. By the end, you will know exactly how to match your local landmarks to the right manufacturing process.
Generic blanks fail entirely in high-end souvenir retail environments. Buyers easily recognize cheap merchandise. When retailers stock flat, generic shapes featuring printed name drops, tourists walk away. Discerning travelers require authentic representations of specific local geometries. They want to touch the textures they saw during their trip. A successful tourist destination magnet must capture the unique spirit of the location.
You must evaluate potential materials using strict performance criteria. Different landmarks require different manufacturing approaches. We recommend assessing materials across three primary pillars:
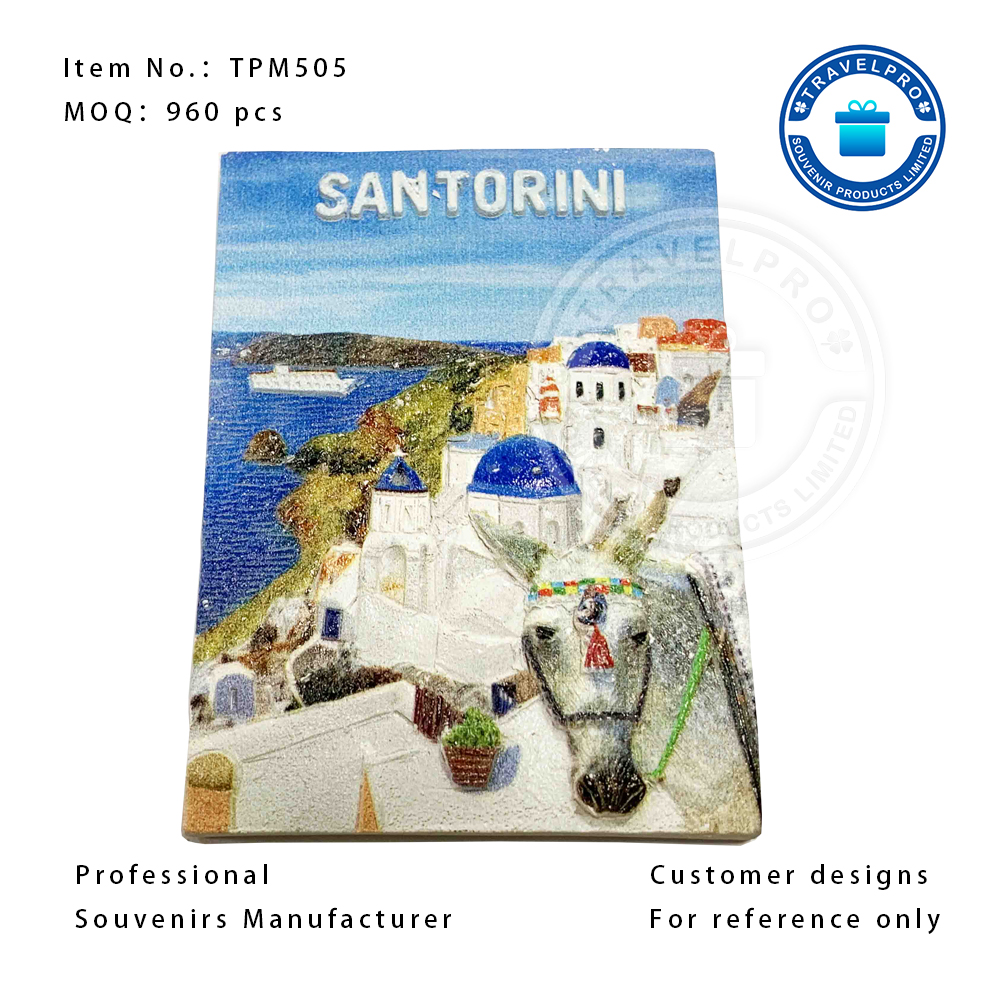
Polyresin reigns supreme for true three-dimensional realism. Manufacturers pour liquid resin into flexible silicone molds. This process captures extreme depths and deep undercuts perfectly. A polyresin landmark magnet can feature intricate, multi-layer 3D shapes. You can accurately replicate deep canyons, statues, and layered building facades. The material cures into a hard, stone-like consistency. It holds micro-textures flawlessly.
Color application requires manual labor. Artisans hand-paint each polyresin piece. This necessity brings both charm and challenge. Manual painting introduces slight unit-to-unit variations. No two pieces look perfectly identical. You must establish strict quality control guidelines. Ensure painters follow standardized color reference guides. This guarantees brand consistency across large production runs.
You must mitigate specific implementation risks when choosing polyresin. The cured material remains quite brittle. Dropping a resin piece onto a hard floor often causes chipping. Therefore, you must use high-density foam packaging. This protective layer increases overall freight volume. Furthermore, resin pieces carry significant physical weight. This weight necessitates a strong, full-coverage rubber magnet backing. Standard small disc magnets will fail under the load. They simply slide down the appliance door.
Verdict: Polyresin works best for complex, high-depth natural wonders. It also suits intricate historical architecture where physical volume communicates premium value.
Metal manufacturing relies heavily on zinc alloy die-casting and stamping. This method excels at sharp two-dimensional lines. It also creates beautiful 2.5D bas-relief profiles. While metal cannot achieve the extreme undercuts of resin, it offers unmatched precision. CNC-machined steel molds ensure every single unit emerges exactly like the prototype. Metal captures fine structural details like suspension cables, window grids, and modern geometric facades.
You have distinct finish options for a metal landmark magnet. Enamel fills bring color to recessed metal areas. Soft enamel leaves a textured, grooved surface. Hard enamel polishes flush against the metal borders for a smooth, premium feel. Alternatively, you can use antique plating. Antique bronze or silver finishes work beautifully for historical landmarks. These unpainted finishes rely entirely on shadow and light to reveal details.
Metal carries its own implementation risks. It cannot replicate true 3D organic shapes effectively. Designing a realistic mountain range in metal often yields clunky results. Additionally, you face higher initial mold fees. Machining steel dies costs significantly more than pouring silicone molds. You must balance these upfront costs against your projected sales volume.
Verdict: Metal suits modern architecture, bridges, or minimalist souvenir magnet design perfectly. Choose metal when you desire sleekness, extreme durability, and a premium "heavy" feel.
Flat materials rely entirely on visual detail rather than physical depth. They offer a completely different aesthetic approach. Sublimation techniques and UV-printed acrylic deliver photorealistic accuracy. You can print actual photographs of landmarks directly onto the surface. Laser-engraved wood provides a rustic, tactile mapping experience. The laser burns away layers of wood to create contrasting topographies.
You must evaluate these materials within their proper context.
Verdict: Flat materials work best for budget-conscious inventory. They suit rapid-turnaround events. Choose them for highly detailed photographic artwork impossible to simplify into a physical mold.
Below is a summary chart comparing these primary material categories.
| Material Category | 3D Depth Capability | Durability Factor | Initial Tooling Cost | Ideal Landmark Use Case |
|---|---|---|---|---|
| Polyresin | High (True 3D) | Low (Brittle) | Low to Medium | Canyons, statues, historical facades |
| Zinc Alloy (Metal) | Medium (2.5D Bas-Relief) | Extremely High | High | Bridges, modern architecture, minimalist art |
| Acrylic / Wood | None (Flat/Visual Only) | High | Zero to Low | Photographic details, rustic park maps |
You must engineer the hold carefully. A common fulfillment failure involves heavy products sliding down the fridge door. Tourists hate buying a beautiful souvenir only to find it cannot hold up a single piece of paper. You must align the magnetic pull-strength with the physical weight of the chosen material.
Standard sizes behave differently across materials. A typical 2x3.5 inch magnet footprint yields vastly different weights. A thick three-inch resin piece requires exponentially more magnetic surface area than a three-inch acrylic piece. You cannot apply a one-size-fits-all approach to backing selection.
You must select the correct backing type for your material weight. Isotropic flexible magnets represent the standard, weaker option. They work fine for lightweight acrylics or thin wood. Anisotropic flexible magnets undergo a specialized manufacturing process. This process aligns the magnetic particles, making them significantly stronger. Anisotropic bases suit resin and metal perfectly. For extremely heavy or irregular 3D shapes, you might require embedded neodymium. Neodymium offers incredible pull-force from a tiny footprint.
| Magnetic Backing Type | Pull-Strength Level | Best Suited For | Cost Impact |
|---|---|---|---|
| Isotropic Rubber (Flexible) | Standard / Weak | Acrylic, Wood, Thin Flat Prints | Low |
| Anisotropic Rubber (Flexible) | Medium / Strong | Polyresin, Standard Metal Enamel | Medium |
| Neodymium (Hard Disc) | Extremely Strong | Heavy 3D Metal, Thick Resin Sculptures | High |
You need to evaluate a manufacturing partner's portfolio rigorously. Request physical samples from their previous production runs. Look for clean mold lines in metal pieces. Check for rough edges or flash (excess metal). For resin pieces, evaluate the precision of the hand-painting. Check the boundaries where two colors meet. Sloppy paint jobs indicate poor factory floor management.
You must mandate a pre-production sample (PPS) before authorizing mass production. Never approve a run based solely on digital renders. You need to hold the physical prototype. Evaluate this prototype under standard indoor lighting. Factory photography often uses intense light boxes. These bright lights hide flaws and alter color perception. Standard kitchen lighting reveals how the product will actually look in a tourist's home.
Establish a strict timeline for your project. Follow these standard sequential steps to ensure success:
No single material is objectively superior across all metrics. The correct choice depends entirely on the specific architectural or natural features of the landmark being replicated. Resin wins for depth, metal wins for durability, and flat materials win for photographic accuracy.
We encourage buyers to audit their current top-selling designs immediately. Request physical material samples from reliable manufacturers to compare tactile weight. Evaluate your initial tooling costs against projected seasonal foot traffic. Proper material alignment ensures higher retail margins, fewer returns, and a stronger brand presence in the homes of your visitors.
A: Most reputable factories require an MOQ of 500 to 1,000 units for custom polyresin or metal magnets. These materials require bespoke molds (silicone or machined steel). Lower MOQs are sometimes possible, but they severely inflate the per-unit cost by distributing the high initial mold fees across too few items.
A: Creating a custom mold typically takes 2 to 4 weeks. This timeframe includes creating the initial 3D digital model, receiving client approval, and physically machining the metal die or pouring the silicone. Producing and shipping the physical pre-production sample adds another 1 to 2 weeks.
A: Yes, factories frequently use hybrid approaches. You can cast a 3D metal or resin base featuring a recessed center. Manufacturers then apply a flat, UV-printed decal into that recess. They often seal this printed area with a clear epoxy dome, combining 3D structural heft with photorealistic details.

